I noticed it's been almost a year since I last posted.
My house project took over most of my spare time, and any wrench time has mostly gone toward maintenance of my 2 trucks.
I have finished the second rear wheel, and am deciding whether to start on the front wheels or start working on the transmission.
I have found a few parts for the future, and need to sell off some of the parts I will not be using.
Purchased new bolts to hook the hub to the brake drum because most of the ones I had were bent. I found them on a ford site for a good price, I just have to cut 1/4" off the end to make them the correct length.
I also found a set of "hubcaps" that were in pretty good shape.
I also bought some Jaxon wheel clamps since I was short one. These are painted black and not chrome like the others so I will have to fix that.
I received some sheet metal working tools for Christmas so maybe I'll try to fab a body panel.
Wednesday, February 5, 2014
Sunday, March 3, 2013
One down three to go
Well I got the wheel ready to go back on. Here it is with the masking removed.

The next challenge was to get the "rust ring" put on the tire. At least for now it isn't rusty anymore.
Check out the sidewalls on that ancient tire. It's funny what a lot of years can do to your tire.

What a sweet moment, mounting the wheel back on the car. I painted the brake drum with heat resistant black paint. The can said it would be good for 1200 degrees F. I figured that if the drums got that hot I would be in trouble. At least I wouldn't have to worry about a brake fluid fire as these are all mechanical.
It took awhile to find 6 straight hub bolts, and I had to run the die over them to be able to put the nuts on. I think I will buy new hub bolts for all the wheels.
I used my big spanner to install it so I could get the full retro feeling.

And here it is with the tire installed. Hooray!! One done only three more to go.

I took the other back wheel off tonight and started to work on it. Hopefully it won't take as long as this one did.
Sunday, February 17, 2013
Back to the wheels
I have been putting a lot of time into refinishing the wheels. After sanding for way too many hours I was able to put a couple coats of finish on the wood. I really like the natural look of the wood so I am avoiding paint for now. I decided if it looked crummy I could always paint over it later.
I neglected to get pictures of the finished wood before I masked it off to paint the steel. I'll put them up after the paint dries and I can strip off the masking.
I painted the "rust ring" and the wheel today.


I neglected to get pictures of the finished wood before I masked it off to paint the steel. I'll put them up after the paint dries and I can strip off the masking.
I painted the "rust ring" and the wheel today.


I used a paint called Hammered Black, I figured it would go well with the "hammered" metal on the wheel.
Get to work
I was reminded by a friend at work that I had not posted for a looooong time. I have been doing some work on the car but haven't posted.
I needed a link between the brake pedal and the actuator shafts. I initially found clevis ends that were for a go-cart that looked like they would work.
After building them I decided they would be too weak.
Next I found some clevis ends from a 28-34 Ford that looked much beefier. Being a Ford guy at heart I decided this would be good for the car. :)
 A comparison between the two linkages, you can see the top is much larger.

You can see the new end is much stronger. Note the thickness around the pin hole. The rod is also 5/16 instead of 1/4.
I needed a link between the brake pedal and the actuator shafts. I initially found clevis ends that were for a go-cart that looked like they would work.
After building them I decided they would be too weak.
Next I found some clevis ends from a 28-34 Ford that looked much beefier. Being a Ford guy at heart I decided this would be good for the car. :)


You can see the new end is much stronger. Note the thickness around the pin hole. The rod is also 5/16 instead of 1/4.
Friday, December 28, 2012
Rim work
The previous owner had sort of modified some carriage bolts to mount the tires. They didn't work well but the idea was good.
I spent some time with a grinder and did some more modification.


The middle bolt is the unmodified one, the two sides are with some grinder work.
They fit snug in the rim now.
I also had some damage on the rim that needed some attention.
This area on the rim was badly beat up. A little work after I get a new Dremel should have it looking like new.
I spent some time with a grinder and did some more modification.


The middle bolt is the unmodified one, the two sides are with some grinder work.
They fit snug in the rim now.
I also had some damage on the rim that needed some attention.

This area on the rim was badly beat up. A little work after I get a new Dremel should have it looking like new.
Tire ring problem solved
As you saw in a previous post the ring that goes on the tire was missing some connection pieces.
I built a piece to tie the two ends together and welded it to the rim.


I built a piece to tie the two ends together and welded it to the rim.

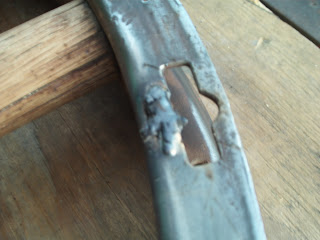
Here is the piece I put in, it still needs a little work.

Here it is closed up. I may drill the new part so it can be pinned to keep it from shifting while it is installed.
To see what I needed to make I pulled the other rear to compare. Oddly enough it was totally different.

Here is the other side, it must be from a different year or model.
Monday, December 17, 2012
Back to work
Well I noticed it's been over a month since I posted anything. I had not done much but a little rust cleanup on the wheel.
I had some time this weekend to do some work so I decided to drill my driveway to mount my vise and bender.

The bolts don't line up too well with my vise since they were drilled to match the bender, but it's good enough.
After taking the wire wheel to the rust on the inside of this ring the piece that ties the ends together fell off.

The rivets just pulled through. I guess the heads rusted away.

So I put some new weld heads on them. With a little grinding it will be good as new.

I'm not exactly sure what is supposed to go in here. Hopefully one of the other wheels has this piece so I can make a replacement.
I was also able to straighten out the edges of the ring so that they were more parallel.
Subscribe to:
Posts (Atom)